How to Do Professional Gel Manicures at Home: Complete Guide

Transform your nails with salon-quality gel manicures from the comfort of your own home. If you've been spending $50 to $80 every two weeks at the nail salon, you're not alone—but what if you could achieve the same stunning, chip-resistant results yourself for a fraction of the cost?
Professional gel manicures offer that coveted high-shine finish and impressive durability that regular polish simply can't match. With the right products and techniques, creating salon-worthy gel nails at home is not only possible but surprisingly straightforward once you understand the fundamentals.
This comprehensive guide will walk you through everything you need to know about gel manicures, from selecting professional-grade products to mastering application techniques that rival your favorite nail technician's work.
You'll learn the insider tips that make the difference between a manicure that lasts three days and one that stays flawless for three weeks. Whether you're a complete beginner or looking to refine your technique, this guide covers common mistakes, troubleshooting solutions, and professional secrets that will elevate your at-home nail game.
The best part? After your initial investment in quality supplies, each gel manicure costs just a few dollars to create. That means your starter kit pays for itself after just three or four applications. Beyond the cost savings, you'll enjoy the creative freedom to experiment with colors and designs whenever inspiration strikes, without waiting for an appointment or rushing to fit salon visits into your busy schedule.
What Makes Gel Polish Different from Regular Polish?
Before diving into application techniques, it's helpful to understand what sets gel polish apart from traditional nail lacquer. This knowledge will help you appreciate why proper technique matters and what to expect from your gel manicures.
Gel polish uses a specialized formula that contains photoinitiators—compounds that react to ultraviolet or LED light. When you cure gel polish under a nail lamp, these photoinitiators trigger a chemical process called polymerization, where liquid monomers link together to form a solid polymer network. This creates an incredibly durable, glossy finish that bonds to your natural nail.
Unlike regular polish that simply air-dries through solvent evaporation, gel polish undergoes an actual chemical transformation. This fundamental difference explains why gel manicures last significantly longer than traditional polish. While regular lacquer typically chips within three to five days, properly applied gel polish maintains its pristine appearance for two to three weeks—and sometimes even longer with proper care.
The curing process also creates that signature glass-like shine that gel nails are famous for. Regular polish can achieve glossiness initially, but it dulls over time as the surface sustains microscopic damage. The hardened polymer structure of gel polish resists this wear, maintaining its mirror-like finish throughout the entire wear period.
Another key difference lies in removal. Regular polish dissolves easily with standard nail polish remover, but gel polish requires soaking in acetone for 10 to 15 minutes to break down the polymer bonds. While this might seem like a drawback, it's actually what gives gel manicures their impressive chip resistance during everyday activities like washing dishes, typing, or other tasks that would destroy regular polish within hours.
Essential Products You Need for Professional Gel Manicures
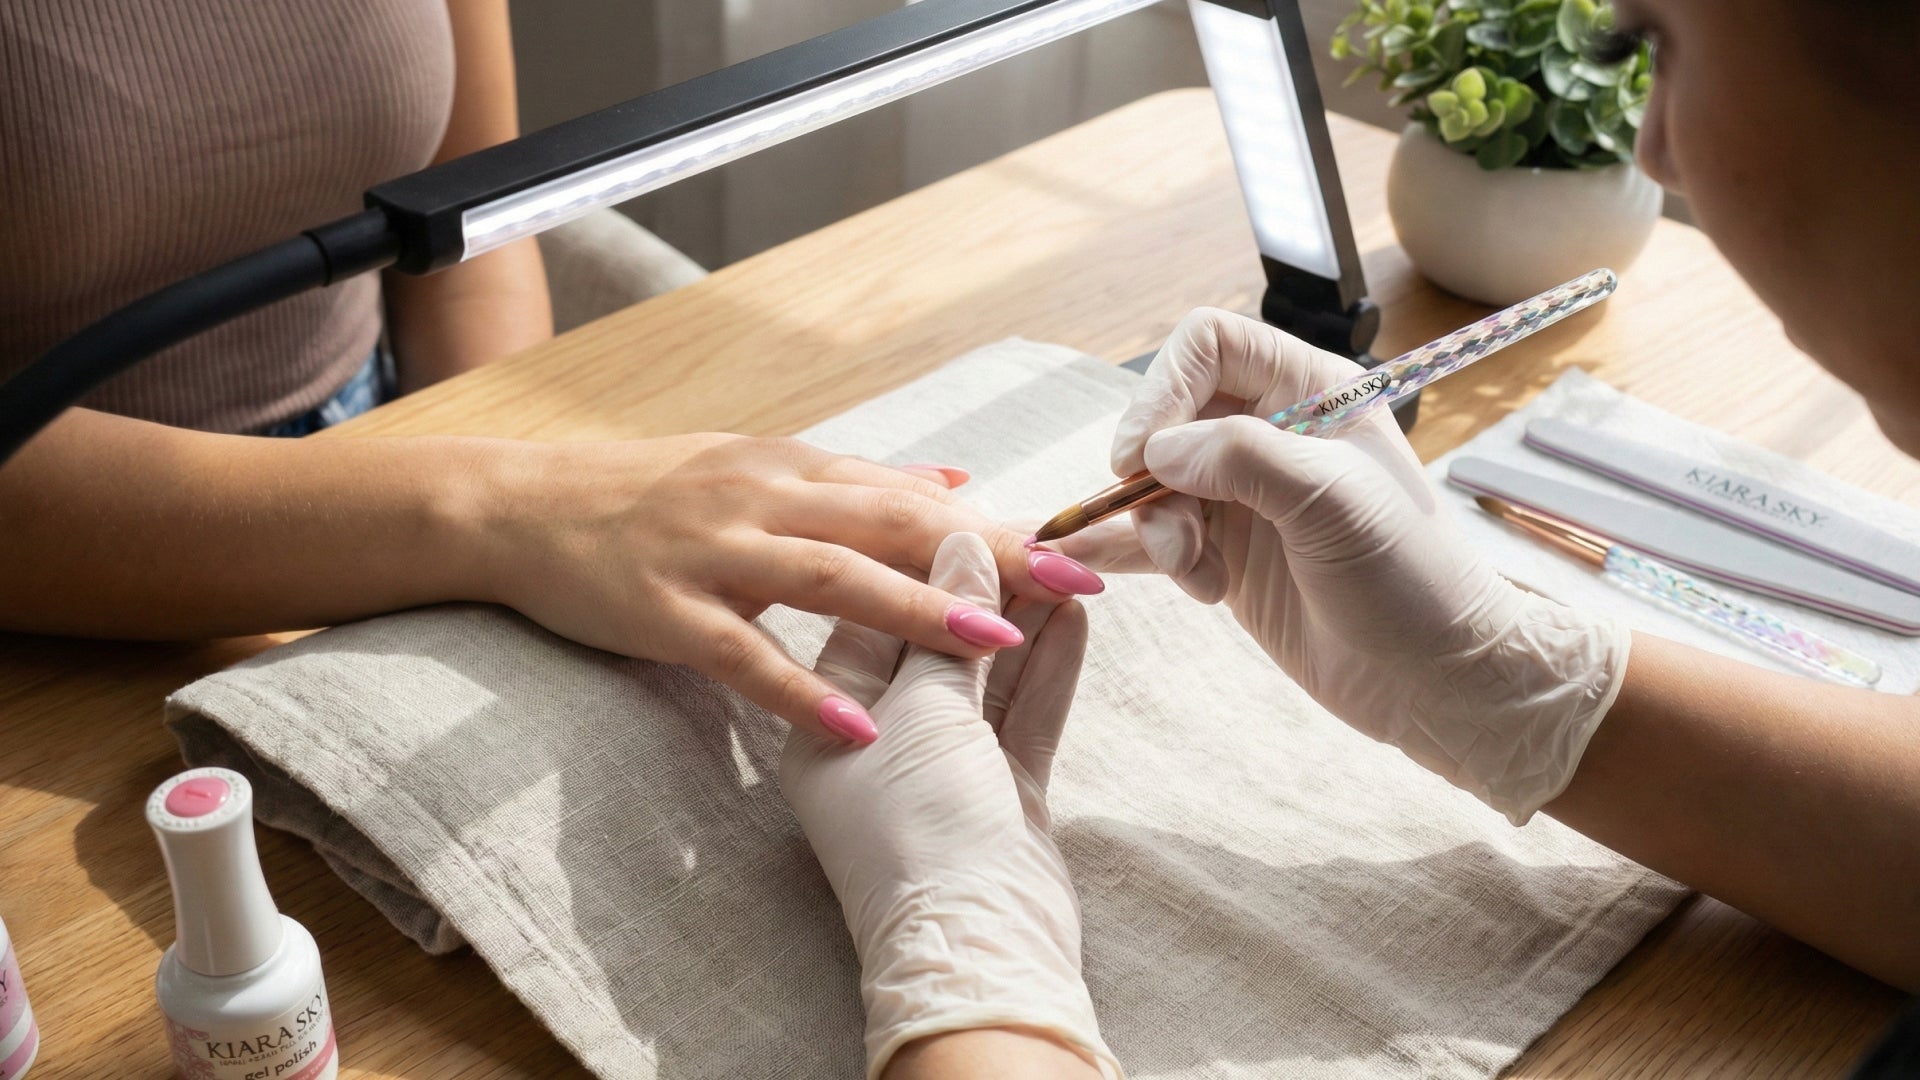
Success with gel manicures starts with having the right products. While it might be tempting to save money with budget alternatives, investing in professional-grade supplies makes an enormous difference in your results and overall experience. Quality products apply more smoothly, cure more reliably, and last significantly longer than cheaper options.
LED or UV Lamp: Your Most Important Investment
Your nail lamp is the cornerstone of your gel manicure setup. Without proper curing, even the highest-quality gel polish won't perform as expected. When selecting a lamp, wattage is crucial—look for a minimum of 48 watts for reliable, fast curing. Lower-wattage lamps may not cure polish completely, leading to soft, sticky nails that peel within days.
LED lamps have largely replaced UV lamps as the professional standard. They cure polish faster (typically 30 to 60 seconds versus 2 to 3 minutes with UV), use less energy, and the bulbs last for years rather than needing periodic replacement. LED lamps also emit a narrower spectrum of light, which many people find more comfortable for regular use.
Look for a lamp with adequate interior space to accommodate your entire hand comfortably. Some budget lamps have cramped interiors that make it difficult to position your hand properly, resulting in uneven curing. A lamp with a removable bottom plate also offers versatility for pedicures.
The Kiara Sky Professional LED lamp exemplifies what to look for in a quality nail lamp. With 48 watts of power, preset timer functions, and a spacious interior, it provides consistent professional results. While a good lamp represents your largest initial expense (typically $40 to $150), it's a one-time investment that will serve you for thousands of manicures.
Base Coat, Color, and Top Coat: The Holy Trinity
The three-layer system of gel manicures isn't just tradition—each layer serves a specific purpose that contributes to the overall durability and appearance of your manicure.
The base coat creates a sticky foundation that helps the color adhere to your natural nail. It also prevents staining, which is particularly important when using highly pigmented colors like reds or dark shades. Quality base coats also provide some flexibility, allowing the gel to move slightly with your natural nail rather than cracking under stress.
Your color coat brings the aesthetic appeal, but quality varies dramatically between brands. Professional-grade gel polishes offer superior pigmentation, meaning you'll achieve full coverage in one or two coats rather than needing three or four thin layers. They also feature better self-leveling properties, flowing smoothly and evenly across the nail surface without creating streaks or bald spots.
The Kiara Sky gel polish collection offers an impressive range of shades with excellent pigmentation and consistency. Their formulas are designed for salon professionals but work beautifully for home use. Similarly, the Chaun Legend signature collections provide carefully curated color palettes that take the guesswork out of building a cohesive nail polish wardrobe.
For your initial collection, consider starting with five to ten colors: two or three versatile neutrals (nude, pale pink, soft beige), two or three seasonal shades, and a couple of statement colors for special occasions. Quality gel polish has excellent longevity—bottles can last for years when stored properly—so building your collection gradually is perfectly reasonable.
Top coat provides the glossy finish and protective layer that seals everything together. A high-quality top coat enhances shine, adds extra chip resistance, and protects the color from dulling or yellowing. Some top coats also offer specific benefits like extra hardness or a quick-cure formula.
Prep and Finish Products
The products that bookend your manicure process might seem less important than the polish itself, but they're actually critical for long-lasting results. Professional nail technicians know that proper preparation prevents the majority of gel manicure failures.
Nail dehydrator or prep solution removes oils and moisture from the nail surface. Your nails naturally have a thin layer of oil that helps keep them flexible and hydrated, but this oil prevents gel polish from bonding properly. Dehydrator temporarily removes this barrier, creating an ideal surface for gel adhesion. Skipping this step is one of the most common reasons gel polish lifts or peels prematurely.
Gel cleanser or isopropyl alcohol (70% or higher concentration) removes the tacky inhibition layer that forms on the surface of cured gel polish. This sticky residue is normal and necessary—it allows layers to bond to each other—but the final layer needs to be removed to reveal the glossy finish underneath. You'll use cleanser after curing your top coat and occasionally between coats if you need to fix a mistake before curing.
Cuticle oil is essential for post-manicure care. While gel polish itself is very dry and hard, your cuticles and surrounding skin need moisture. Daily application of cuticle oil prevents dryness, hangnails, and the temptation to pick at your cuticles, which can damage your manicure. Quality cuticle oil often contains vitamin E and nourishing oils that keep your hands looking as good as your nails.
Cotton pads and lint-free wipes serve different purposes in gel application. Regular cotton pads work fine for most cleaning steps, but lint-free wipes are crucial when cleansing the final top coat. Regular cotton can leave tiny fibers on the sticky surface, which become embedded in your glossy finish and create a slightly fuzzy appearance.
Tools You'll Need
Beyond polish and prep products, several basic tools make the application process smoother and more professional.
A quality nail file in 180-grit is perfect for shaping and maintaining your nails between manicures. Avoid metal files, which can be too harsh and create microscopic tears in the nail edge that lead to splitting and peeling. Glass or high-quality emery board files provide smooth, controlled filing.
A buffer block with various grit levels helps you prepare the nail surface before applying gel polish. You want to very lightly buff the shine off your natural nails—just enough to create a slightly rougher surface that gel can grip, but not so much that you thin the nail plate. Over-buffing is a common mistake that can cause nail damage and actually make polish adhere less effectively.
A cuticle pusher helps you gently push back your cuticles before starting your manicure. Stainless steel pushers are durable and easy to sanitize, while wooden orange sticks are gentler and disposable. The key is gentle pressure—you're not trying to remove the cuticle entirely, just push it back slightly to create a clean application surface.
Cuticle nippers are optional but helpful if you have significant excess cuticle or hangnails. If you do use nippers, exercise extreme caution. Only trim truly dead tissue—never cut living skin around your nails, as this can lead to infection and painful hangnails. When in doubt, leave more rather than cutting too much.
A nail brush for cleaning under and around your nails ensures you don't trap dust or debris under your gel polish. A soft toothbrush works perfectly for this purpose.
Preparing Your Nails: The Foundation of a Long-Lasting Manicure
Professional nail technicians will tell you that preparation accounts for at least 50% of a successful gel manicure. You can have the highest-quality products and perfect application technique, but if your natural nails aren't properly prepped, your manicure won't last.
The goal of preparation is to create an ideal surface for gel adhesion while ensuring your nails and surrounding skin are healthy and clean. This process takes 10 to 15 minutes but makes the difference between a manicure that lasts three days and one that remains flawless for three weeks.
Start by removing any old polish completely, whether it's regular or gel. If you're removing gel polish, use the proper soak-off method with acetone—never peel or pick at gel polish, as this removes layers of your natural nail along with the product, causing significant damage over time.
Once your nails are bare, use your nail file to shape them to your desired length and shape. File in one direction only rather than using a back-and-forth sawing motion. The sawing motion creates microscopic tears at the free edge of your nail, making them more prone to splitting and breakage. Consistent one-direction filing creates a smooth edge that's less likely to catch on things and chip your manicure.
For gel manicures, slightly shorter nails tend to perform better than very long extensions. The longer your nail, the more leverage force is applied when you bump or press on the tip, making chips and breaks more likely. Aim for no more than a quarter inch of free edge beyond your fingertip for optimal durability.
Next, address your cuticles. Gently push them back using your cuticle pusher, working carefully around the base of each nail. Your cuticle is actually dead tissue that serves as a protective seal at the base of your nail, so you're not removing it—just pushing it back slightly so it's not sitting on the nail plate where you'll be applying gel polish. If gel polish is applied over your cuticle, it creates a weak point where lifting typically begins.
If you have any loose, ragged cuticle tissue or hangnails, you can carefully trim these with cuticle nippers. However, resist the urge to be overly aggressive. Your goal is to clean up obvious excess, not to remove all visible cuticle tissue. Less is more when it comes to cuticle trimming.
Now comes one of the most crucial steps: lightly buffing the nail surface. Use a fine-grit buffer (180 to 240 grit) and very gently remove the natural shine from your nail plate. You're not trying to make the surface rough or to thin your nails—you simply want to scuff away the slick, shiny outer layer that would prevent good adhesion. Think of it like lightly sanding wood before painting: too little and the paint won't stick properly; too much and you damage the underlying structure.
After buffing, brush your nails thoroughly with your cleaning brush to remove all dust. Even tiny particles of nail dust can prevent proper adhesion and create bumpy spots in your finished manicure. Brush the nail surface, under the free edge, and around the sides and cuticle area.
Use a cotton pad dampened with acetone or rubbing alcohol to wipe each nail completely clean. This removes any remaining dust, oils from your skin, or residue from products. Let your nails dry completely—rushing this step is a common cause of gel polish lifting.
The final preparation step is applying nail dehydrator. This product temporarily removes moisture and oils from the nail plate, creating the ideal surface for gel adhesion. Apply a thin coat to each nail and allow it to dry completely—you'll see the slight shine disappear as the dehydrator works, leaving a very matte finish.
A critical tip that many beginners miss: once you've applied dehydrator, avoid touching your nails with your fingers. The oils on your skin can transfer back onto the nail surface, undoing your careful preparation. If you need to adjust something, use a clean orange stick or tool rather than your fingertips.
Step-by-Step Gel Polish Application Process
With your nails properly prepared, you're ready to begin the application process. The key to professional results is working methodically and patiently—rushing through application almost always leads to mistakes that compromise the longevity and appearance of your manicure.
Step 1: Apply Base Coat
Your base coat creates the foundation for your entire manicure, so take your time with this step. The goal is a thin, even layer that covers the entire nail surface without flooding the cuticles or sidewalls.
Start by rolling the bottle of base coat between your palms rather than shaking it. Shaking creates air bubbles in the formula, which can transfer to your nails and create tiny imperfections in your finish. Rolling gently mixes the product without introducing bubbles.
Wipe the brush against the inside of the bottle neck to remove excess product. You want just enough polish on the brush to cover one nail—excess product makes it harder to control application and leads to flooding.
Apply base coat using a three-stroke method: place the brush near your cuticle (but not touching it), gently press down so the polish spreads slightly, then stroke toward the free edge. Repeat this on the left and right sides of the nail. The goal is smooth, even coverage without touching the cuticle or getting polish on the skin around your nail.
Pay special attention to "capping the free edge"—this means swiping the brush across the very tip of your nail, sealing the edge with base coat. This crucial step prevents water and oils from seeping under the gel from the free edge, which is one of the most common causes of lifting and chipping.
Once you've applied base coat to all ten nails (or five nails if you prefer to work one hand at a time), cure them under your LED lamp. Most base coats cure in 30 to 60 seconds under an LED lamp. Follow the specific timing recommended for your products, but when in doubt, a full 60 seconds ensures complete curing.
You'll know your base coat is properly cured when it's completely hard and no longer feels tacky or soft. If it still feels slightly soft, cure for another 30 seconds. Under-cured base coat won't provide a stable foundation for your color coats.
Step 2: First Color Coat
Now comes the fun part—applying your chosen color. The same principles that applied to base coat apply here: thin layers, careful cuticle avoidance, and capping the free edge.
Before opening your color polish, roll the bottle between your palms to ensure the pigments are evenly distributed. This is especially important for glitter polishes or shades with shimmer, where settling can occur.
Wipe the brush to remove excess polish, then apply using the same three-stroke method you used for base coat. With color polish, you want to be especially mindful of creating a thin, even coat. Thick applications of color take longer to cure, may not cure completely in the center, and are more prone to wrinkling or bubbling.
When applying near the cuticle, leave a hair's width of space between the polish and your cuticle line. This tiny gap prevents flooding while being small enough that it's invisible to the eye once your manicure is complete. If you do get polish on your skin, don't panic—use an orange stick or small brush dipped in rubbing alcohol to clean it up before curing.
Don't forget to cap the free edge with color polish as well, just as you did with base coat. Run the brush across the tip of your nail to seal that vulnerable edge.
Cure your first color coat for the time specified for your polish, typically 30 to 60 seconds for LED lamps. Most colors require two coats for full opacity, though some highly pigmented shades cover perfectly in a single application. The Chaun Legend signature collections, for example, are formulated for excellent one-coat coverage, though two coats provide even richer color depth.
Step 3: Second Color Coat
Assess whether you need a second color coat by looking at your nails in natural light. If you can see your natural nail showing through or if coverage appears uneven, a second coat is necessary. Most colors look more vibrant and professional with two thin coats rather than one thick coat.
Apply your second color coat using the exact same technique as the first: thin application, three strokes, avoid cuticles, cap the free edge. Consistency between coats creates the most professional results.
Cure the second color coat for the full recommended time. Even if the surface feels dry after 30 seconds, giving it a full 60-second cure ensures the entire layer is solid throughout, not just on the surface.
Step 4: Top Coat Application
The top coat is the final protective layer that seals everything together and creates that gorgeous high-gloss finish gel nails are known for. You can apply top coat slightly thicker than your base and color coats—the extra thickness actually helps create a smoother, shinier surface.
Apply top coat over the entire nail surface using the same cuticle-avoidance techniques you've been practicing. The most crucial part of top coat application is thoroughly capping the free edge. This final seal over the tip of your nail is what protects against chips and peeling, so be generous with top coat on that edge.
Some people like to wrap the underside of the free edge as well, applying a thin coat of top coat to the underside tip. This provides even more protection, though it's not necessary for shorter nails. For longer nails or if you're hard on your hands, this extra step can significantly extend your manicure's lifespan.
Cure your top coat according to the manufacturer's directions. Top coats often require a slightly longer cure time than other layers—60 to 90 seconds is typical. Don't shortchange this final cure; incomplete curing leaves your top coat slightly soft and more vulnerable to damage.
Step 5: Cleanse and Finish
After curing your top coat, you'll notice your nails have a sticky, tacky surface. This is the inhibition layer—a normal byproduct of the curing process that must be removed to reveal the glossy finish underneath.
Dampen a lint-free wipe with gel cleanser or 91% isopropyl alcohol and gently wipe each nail. You should see the sticky layer transfer to the wipe, leaving behind a perfectly glossy, hard surface. Use a fresh section of the wipe for each nail to avoid redistributing the tackiness.
Immediately after cleansing, apply cuticle oil to each nail, massaging it into the cuticle and surrounding skin. This instant hydration helps counteract the drying effects of the application process and keeps your cuticles healthy. Don't skip this step—healthy cuticles are essential for long-lasting manicures and overall nail health.
Finish with a good hand cream, avoiding the actual nail surface (you don't want to add oils on top of your fresh manicure). Your hands have been through a lot of product exposure and washing during this process, so they'll appreciate the moisture.
One final tip: avoid getting your hands wet for at least an hour after completing your gel manicure. While the gel is fully cured and hard, giving it this final settling time ensures maximum durability. After that, your nails are ready for anything—dishes, typing, working out, whatever your life demands.
Common Gel Manicure Problems and How to Fix Them
Even with careful application, you might encounter some common gel manicure issues. Understanding why these problems occur and how to prevent them helps you improve your technique and get better results with each manicure.
Peeling or Lifting Within Days
If your gel polish starts lifting or peeling after just a few days, it's almost always due to one of these factors: inadequate nail preparation, flooding the cuticle area, or applying coats that are too thick.
The solution lies in meticulous preparation. Make sure you're thoroughly removing all oils from the nail surface with dehydrator and avoiding touching your prepared nails with your fingers. When applying gel polish, maintain that tiny gap between the polish and your cuticle—gel polish that touches the cuticle will lift as the cuticle grows and moves.
Very occasionally, lifting can indicate that the specific gel polish formula isn't compatible with your natural nail chemistry. Some people find certain brands adhere better than others. Professional-grade products like Kiara Sky and Chaun Legend are formulated for compatibility with a wide range of nail types, but if you continue experiencing lifting despite perfect technique, trying a different brand might help.
Chipping at Tips
Chips at the free edge of your nails almost always come down to one thing: not properly capping the edge. The tip of your nail endures the most stress and exposure during daily activities. Every time you type, button a shirt, or open a container, force is concentrated at that vulnerable edge.
The fix is simple but requires vigilance: cap the free edge with every single layer—base coat, each color coat, and especially top coat. Swipe the brush across the tip of your nail, creating a seal that protects against chips. This single technique dramatically improves manicure longevity.
Also consider whether your nails are too long. Very long extensions experience more stress at the tips due to leverage. If you're consistently experiencing tip chips, try slightly shorter nails for your next manicure.
Wrinkling or Bubbling
Wrinkles or bubbles in cured gel polish typically result from applying layers that are too thick. When a layer of gel polish is very thick, the outside surface cures before the inside layer does. As the inner portion continues to cure, it contracts slightly, pulling on the already-hardened surface and creating wrinkles or bubble-like imperfections.
The solution is counterintuitive: multiple thin coats create better results than fewer thick coats. Think "thin to win" when applying any layer. If your current technique creates these issues, try using less product on your brush and building coverage gradually with additional thin coats rather than trying to achieve full coverage in one heavy application.
Under-curing can also contribute to wrinkling. Make sure you're curing for the full recommended time and that your lamp has adequate wattage. If your lamp is older or has significantly reduced output, consider upgrading to ensure proper curing.
Sticky Residue Won't Come Off
If you're struggling to remove the tacky inhibition layer after your final cure, the most likely culprits are using the wrong cleanser or not curing long enough.
Gel cleanser or high-percentage isopropyl alcohol (at least 70%, though 91% works better) is necessary to remove the inhibition layer. Lower-percentage alcohol or regular nail polish remover won't effectively remove the tackiness. Make sure you're using the appropriate product.
If you're using the right cleanser and still experiencing excessive stickiness, your gel might not be fully cured. Try extending your cure time by 30 seconds, particularly for the top coat. Some top coat formulas require longer curing than others to fully harden.
Color Looks Streaky or Uneven
Streaky color typically indicates one of three issues: applying too much product at once, polish that's too thick in consistency, or low-quality pigmentation.
When applying color, less product on the brush gives you more control. If you're loading the brush heavily, you're more likely to create thick, uneven patches that cure streaky. Try wiping more excess product off the brush before application.
Some gel polishes naturally have thinner or thicker consistency. If your polish seems very thick and difficult to apply smoothly, it may have thickened from age or improper storage. While you can sometimes revive thickened gel polish, it's often better to replace it for best results.
Pigmentation quality varies dramatically between brands. Low-quality polishes simply don't have enough pigment to create smooth, even color, no matter how carefully you apply them. This is where investing in professional-grade products like Kiara Sky makes a significant difference—their superior pigmentation creates streak-free coverage even for beginners.
If you're working with a color that tends toward sheerness or streaking, adding a third thin coat often solves the problem better than trying to achieve coverage with two thick coats.
Nail Damage or Weakness
If your natural nails seem weaker or more damaged after doing gel manicures, the culprit is almost certainly improper removal or over-buffing during preparation.
Proper removal is absolutely crucial for nail health. Never peel, pick, or force off gel polish. This removes layers of your natural nail along with the gel, causing immediate damage that takes months to grow out. Always use the acetone soak-off method and be patient—if the gel isn't sliding off easily after soaking, it needs more time in acetone.
During preparation, be conservative with buffing. You only need to very lightly remove the shine from your natural nail—aggressive buffing thins the nail plate and creates lasting damage. If you're buffing so much that you see white dust from your nail (as opposed to just old polish residue), you're over-buffing.
If you notice your nails becoming damaged, take a break from gel polish for a few weeks while focusing on nail care: daily cuticle oil, a strengthening treatment, and wearing gloves for housework and dish washing. Your nails will recover, and you can resume gel manicures with adjusted technique.
How to Safely Remove Gel Polish at Home
Proper removal is just as important as proper application when it comes to maintaining healthy nails. The removal process requires patience, but following the right protocol ensures your natural nails remain strong and undamaged.
The Foil Wrap Method (Professional Standard)
The foil wrap method is the gold standard for gel polish removal. While it takes a bit longer than some shortcuts you might be tempted to try, it's the safest and most effective way to remove gel polish without damaging your natural nails.
Start by gathering your supplies: pure acetone (not regular nail polish remover), cotton pads or balls, aluminum foil cut into squares large enough to wrap around your fingertip, a cuticle pusher or orange stick, and cuticle oil for post-removal care.
Lightly file the shiny top coat off your gel manicure using a coarse nail file (100 to 180 grit). You're not trying to remove all the gel polish through filing—just break the seal of the top coat so the acetone can penetrate more effectively. This step significantly reduces the soaking time needed.
Soak a cotton pad in pure acetone and place it on top of your nail, ensuring it covers the entire nail surface. Wrap the aluminum foil tightly around your fingertip, securing the cotton pad against your nail. The foil prevents the acetone from evaporating and keeps it in contact with the gel polish.
Repeat this process for all ten nails, then wait patiently. Set a timer for 10 minutes minimum, though some gel polishes require 12 to 15 minutes. Resist the urge to unwrap early—adequate soaking time is crucial for easy removal.
After the timer goes off, remove the foil wrap from one finger and use your cuticle pusher to gently push the softened gel polish off your nail. It should slide off easily with minimal pressure. If you encounter significant resistance, rewrap that finger and give it another 5 minutes rather than forcing it.
Work through each nail, removing the foil and gently pushing off the softened gel polish. For any stubborn spots, don't scrape aggressively—a gentle nudge should be sufficient if the gel is properly softened. Aggressive scraping causes nail damage.
Post-Removal Care
Once all gel polish is removed, wash your hands thoroughly to remove acetone residue. Acetone is extremely drying, so immediate rehydration is important.
Apply cuticle oil generously to each nail and massage it into the nail and surrounding skin. Follow with a rich hand cream, paying special attention to your fingertips and nail beds.
Your nails may feel and look slightly dry or dull after gel removal—this is normal and temporary. With proper moisturizing care over the next day or two, they'll return to their normal appearance.
Many people wonder whether they need to give their nails a "break" between gel manicures. If you're using proper application and removal techniques, your nails don't require breaks. However, if you notice any thinning, splitting, or damage, allowing a few weeks of recovery time with intensive moisturizing care can help restore nail health before your next gel manicure.
What to Avoid During Removal
Never peel or pick at gel polish, even if edges are lifting. This is the number one cause of nail damage from gel manicures. Peeling removes layers of your natural nail along with the gel polish, creating immediate damage that takes months to repair.
Don't use regular nail polish remover for gel removal—it's not strong enough to break down the polymer structure. You'll waste time and effort without achieving proper removal.
Avoid rushing the soaking process. If you remove the foil wraps too early, you'll have to scrape and force the gel polish off, which risks nail damage. The few extra minutes of proper soaking time are always worth it.
Professional Tips for Long-Lasting Gel Manicures
Once you've mastered the basics, these professional tips will help you achieve even better results and longer-lasting manicures.
Wear gloves whenever you're doing dishes, cleaning, or working with harsh chemicals. While gel manicures are remarkably durable, prolonged exposure to hot water and cleaning products breaks down the polish faster and can cause lifting at the cuticles.
Apply cuticle oil daily, even when wearing gel polish. This keeps your cuticles healthy and flexible, preventing the dry, ragged cuticles that can catch on things and accidentally pull at your gel manicure. Healthy, moisturized cuticles also look more attractive and professional.
Avoid using your nails as tools. Opening cans, removing staples, scratching off stickers—these activities put stress on your nails that can cause chips or breaks. Use actual tools instead, and your manicures will last significantly longer.
If you notice a tiny chip or lifting at the edge of a nail, you can sometimes extend your manicure's life with a minor touch-up. Lightly file the rough edge smooth, wipe with rubbing alcohol, then apply a thin coat of top coat just to that area. Cure as normal. This isn't a permanent fix, but it can buy you a few extra days until you have time for a proper removal and new application.
Store your gel polish bottles in a cool, dark place away from direct sunlight. Heat and light can affect the formula over time, potentially impacting performance. The shelf life of properly stored gel polish is typically 2 to 3 years after opening.
Pay attention to how long products have been open. While gel polish doesn't "go bad" like food, very old gel polish may thicken or separate. If you notice performance changes in an older bottle, it may be time to replace it.
Clean your LED lamp periodically by wiping the interior with rubbing alcohol on a cotton pad. Dust and product residue can accumulate over time, potentially reducing the lamp's effectiveness.
Best Gel Polish Brands: Professional vs. Consumer Grade
Not all gel polish is created equal, and the difference in quality between professional-grade and mass-market products is significant enough to dramatically affect your results.
Professional brands like Kiara Sky invest heavily in research and development to create formulas that cure reliably, apply smoothly, and wear beautifully. The pigmentation in their colors is carefully calibrated so that you can achieve full coverage in one to two coats. The consistency is optimized for self-leveling, so the polish flows smoothly across the nail surface without creating bald spots or thick puddles.
Kiara Sky offers an extensive range of gel polish colors, from classic neutrals to on-trend shades to specialty finishes. Their formula is designed to work reliably with LED lamps, curing quickly and completely without wrinkling or bubbling. The company has built its reputation among professional nail technicians, which means their products are formulated to withstand the demands of salon use—exactly what you want for dependable at-home results.
Chaun Legend has gained a devoted following for their carefully curated color collections. Rather than overwhelming consumers with hundreds of random shades, they focus on cohesive collections that work together beautifully. Their signature must-haves collection includes universally flattering shades that suit any occasion or style, taking the guesswork out of color selection for beginners.
The practical difference between professional and consumer-grade gel polish shows up in multiple ways. Professional polish applies more smoothly with better control. It cures more reliably without soft spots or tacky surfaces. The colors maintain their vibrancy throughout the full wear period without fading or yellowing. The formula resists chipping and lifting, often lasting a full three weeks with proper care.
Budget or consumer-grade gel polish might save money initially, but the frustration of poor performance often ends up costing more in wasted time and product. Streaky application, inadequate coverage even after three coats, premature chipping, and inconsistent curing all create disappointing results that undermine the whole point of doing your nails at home.
The investment in professional-grade products pays dividends in every manicure you do. When you consider that a single salon gel manicure costs $50 to $80, spending $15 to $25 on a bottle of professional gel polish that will provide 20 to 30 manicures represents exceptional value.
Building Your Gel Polish Collection
Starting your gel polish collection can feel overwhelming given the thousands of colors available. A strategic approach helps you build a versatile collection that serves your needs without breaking the bank.
Begin with five essential neutrals that you'll reach for repeatedly: a true nude that matches your skin tone, a soft pink, a versatile beige or taupe, a classic red, and a pale, nearly clear pink for natural-looking manicures. These workhorses go with everything and suit any occasion.
Add three seasonal colors that reflect current trends or your personal style. In spring and summer, this might include coral, mint green, or lavender. Fall and winter could bring burgundy, navy, or deep forest green. These colors keep your collection fresh and allow you to change with the seasons.
Include two statement shades for special occasions or when you're feeling bold—perhaps a dramatic deep purple, a glittery silver, or a striking cobalt blue. You won't wear these as often as your neutrals, but having options for special events or mood-based choices makes your collection more satisfying.
As your collection grows, you can add colors that speak to you personally. Maybe you love pastels and want a full range of soft shades. Perhaps you gravitate toward jewel tones. Or maybe you're drawn to unique finishes like magnetic polishes or chrome effects. Build your collection based on what you'll actually wear rather than trying to own every color.
Organization helps you maintain and enjoy your collection. Store bottles upright in a drawer or on a shelf away from direct sunlight. Some people organize by color family, others by frequency of use. The system matters less than having one—organized polish is polish you'll actually use.
Cost Analysis: Home vs. Salon Gel Manicures
Let's break down the real numbers to understand your return on investment for at-home gel manicures.
A typical salon gel manicure costs $50 to $80 depending on your location and the salon's positioning. If you get gel manicures every two to three weeks, that's $1,200 to $2,000 per year—a significant expense for something you can learn to do yourself.
Your initial investment in supplies ranges from $150 to $300 depending on the quality level you choose. A professional LED lamp ($50 to $150), a selection of 10 gel polish colors ($150 to $250), and necessary prep and finish products ($30 to $50) form your basic kit. This might seem like a substantial outlay, but let's look at the per-use cost.
After your initial investment, each gel manicure costs $3 to $5 in product. Base coat, top coat, and polish are the only consumables, and they last for many applications. A bottle of gel polish provides 20 to 30 manicures depending on how heavily you apply.
Your break-even point arrives after just three to four at-home manicures. After that, every gel manicure you do yourself represents real savings. Over the course of a year, you could save $1,000 to $1,800—more than enough to justify building a robust collection of colors and trying new products.
Beyond pure financial savings, at-home gel manicures offer time savings and convenience. No more scheduling appointments around your busy life, sitting in traffic to reach the salon, or spending two hours out of your day on something you can do at home in 45 minutes while watching your favorite show.
The creative freedom is another intangible benefit. Want to try a new color at 10 PM on a Tuesday? Go for it. Want to experiment with nail art or try a technique you saw online? You can practice without paying salon prices for each attempt. Want to match your nails to a specific outfit? Easy when you control your entire nail routine.
Frequently Asked Questions
How long does gel polish last?
With proper application and care, gel manicures typically last two to three weeks. Some people can extend this to four weeks, though most prefer to remove and redo their manicure by the three-week mark as natural nail growth becomes noticeable at the cuticle area.
Is gel bad for your nails?
Gel polish itself is not inherently damaging to nails. The damage that some people experience comes from improper application (over-buffing during prep) or improper removal (peeling or picking at the gel). When applied and removed correctly, gel manicures do not harm natural nails.
Can I use regular polish with gel top coat?
This combination doesn't work well because regular polish and gel polish cure through different chemical processes. Regular polish dries through air evaporation, while gel polish requires UV or LED light to polymerize. The gel top coat won't properly bond to regular polish, leading to peeling and poor wear.
What if I don't have a UV lamp?
A UV or LED lamp is absolutely essential for gel manicures—gel polish will not dry or harden without it, regardless of how long you wait. The curing lamp is a necessary investment for gel manicures. If you're not ready to invest in a lamp, consider regular polish or gel-effect polish that air-dries instead.
How do I know when my gel polish is cured?
Properly cured gel polish is completely hard with no flexibility or stickiness (except for the normal tacky inhibition layer on top coat before cleansing). If you can make an indent in the polish with your fingernail or if it feels soft when pressed, it needs more curing time.
Can I do gel manicures on short nails?
Absolutely! Gel manicures work beautifully on short nails. In fact, shorter nails often wear gel polish longer than very long nails because they experience less stress and leverage force at the tips.
What's the difference between gel and shellac?
Shellac is actually a brand name for a specific gel-polish hybrid product created by CND. Many people use "shellac" and "gel polish" interchangeably, but technically shellac is one specific product within the broader category of gel polish. The application and removal processes are essentially the same.
How often should I give my nails a break?
If you're using proper application and removal techniques, your nails don't need regular breaks from gel polish. However, if you notice any signs of damage like thinning, splitting, or weakness, taking a few weeks off to focus on nail health is wise. Listen to your nails and respond to what they need.
Can gel polish expire?
Gel polish can separate, thicken, or lose effectiveness after extended storage, typically 2 to 3 years after opening. If your gel polish has significantly changed in consistency, doesn't cure properly, or has separated in the bottle and won't remix, it's time to replace it.
What's the best way to store gel polish?
Store gel polish bottles upright in a cool, dark place away from direct sunlight and heat sources. Extreme temperatures can affect the formula. A drawer or closed cabinet works perfectly. Keeping bottles tightly closed prevents the polish from thickening over time.
Final Thoughts: Your Journey to Perfect At-Home Gel Manicures
Mastering at-home gel manicures represents more than just learning a beauty technique—it's about taking control of your self-care routine, saving significant money, and developing a skill you'll use and refine for years to come.
The learning curve is real, and your first few attempts might not achieve the flawless results you're imagining. That's completely normal and expected. Professional nail technicians have done thousands of sets before reaching their skill level. Give yourself permission to be a beginner and focus on improvement rather than perfection.
With each manicure you do, you'll notice your technique improving. Your application will become smoother and more confident. You'll develop muscle memory for the right amount of product to use and how to manipulate it for the best results. The entire process will become faster and more intuitive.
The investment in quality products truly does pay off, both in terms of results and in the satisfaction of working with materials that perform reliably. While it might be tempting to save money with budget alternatives, professional-grade products from brands like Kiara Sky and Chaun Legend make the learning process significantly easier and more enjoyable.
Start with the basics—a good LED lamp, a handful of versatile colors, and essential prep and finish products. You can always expand your collection as your skills and confidence grow. Many people find that building their polish collection gradually over time is part of the fun, discovering new favorite shades and techniques along the way.
Remember that the goal isn't necessarily to replicate every intricate design you see on social media. Simple, beautifully applied solid colors look professional, polished, and elegant. As you become more comfortable with basic application, you can experiment with nail art, special effects, and creative designs if that interests you.
The freedom and flexibility of at-home gel manicures transform your relationship with nail care. No more scheduling hassles, no more expensive salon visits, no more settling for available appointment times that don't really work for you. Your nail routine becomes something you control completely, fitting seamlessly into your life rather than requiring you to rearrange your schedule around it.
Beyond the practical benefits, many people find the ritual of doing their own gel manicures to be genuinely relaxing and meditative. Taking time to focus on this small act of self-care, working methodically through each step, and seeing the beautiful results of your effort provides satisfaction that extends well beyond just having pretty nails.
Ready to get started? Explore our collection of professional gel polish systems, LED lamps, and all the supplies you need to create salon-quality manicures at home. Whether you choose the tried-and-true reliability of Kiara Sky or the curated color perfection of Chaun Legend, you're investing in products that will serve you beautifully for countless manicures to come.
Your journey to perfect at-home gel manicures starts now. With patience, practice, and the right products, you'll soon be creating professional results that rival any salon—and enjoying the creative satisfaction and financial freedom that comes with mastering this valuable skill.